16 May 10 Site Speed Optimizations For Fast Load Times
In a technologically forward world, speed is everything. People don’t like to wait. This is especially true when it comes to browsing the web. You could have the most aesthetically pleasing and most modern website ever built, but it means close to nothing if it takes forever to load. There are a plethora of reasons why your site could be slow; some that are out of your control, and some that can be controlled. At MK Group, every web development and design project has site speed optimization in mind. Having said that, today we’re going to give you ten of the best tips to boost performance and load times.
But first, we need to understand why site speed matters.
PS: We use all of these techniques ourselves.
Why Site Speed Matters
Data shows that users will wait up to 3 seconds before bouncing. Three seconds. Notice we said “up to”. It’s possible users will bounce under the three second threshold too. If your website takes longer than that to populate with important information, then the chances of users losing focus and exiting dramatically increase.
Sites that manage to load in the above timeframe show lower bounce rates, higher conversion rates, higher rankings in organic search, and a better overall user experience. The bottom line is that slow websites can and will cost you money and hurt your brand image.
How To Test Site Speed
Before you jump in and optimize your website, you first need a benchmark. Without knowing how the site is currently performing, you’ll never know if there was improvement after changes were made.
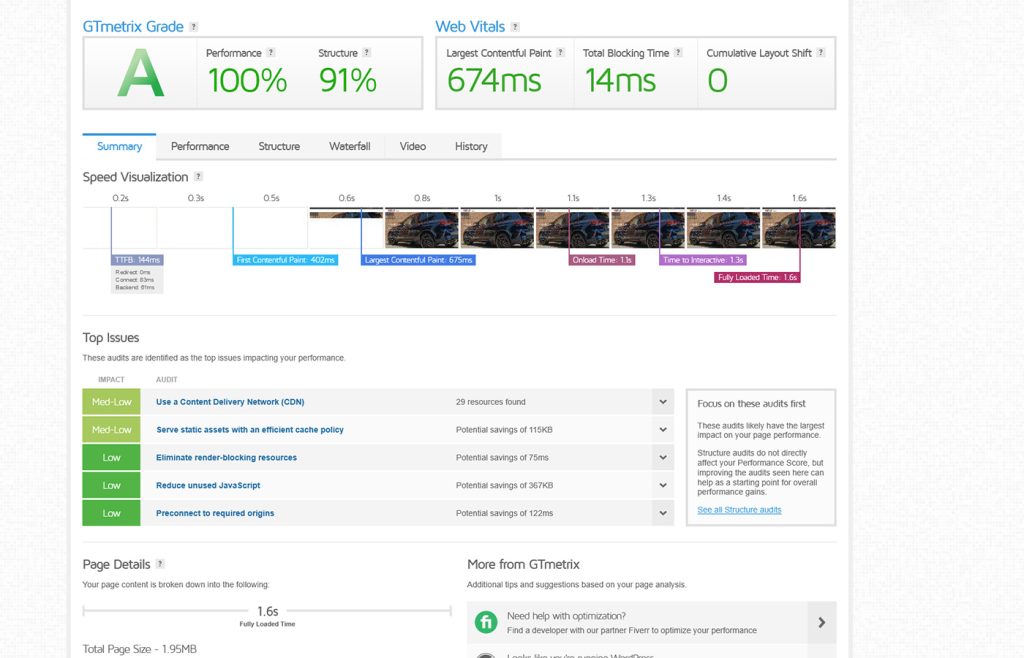
There’s many metrics that are measured during these tests, but we highly recommend shifting most of your attention to Largest Contentful Paint (LCP), First Input Delay (FID), and Cumulative Layout Shift (CLS). These three metrics are defined as Google’s Core Web Vitals.
So how do you test site speed? There’s several solutions which can be found online that measure Core Web Vitals accurately. The most obvious one being Google PageSpeed Insights. However, we recommend using Google PSI in conjunction with another popular site speed measuring tool; GT Metrix. As mentioned above, don’t get too hung up on all the metrics you’ll see. Trying to get an absolutely perfect score on either of the tools is a cat and mouse game, and it’ll drive you up the wall. We warned you.
What’s a Good Website Speed?
Focusing on the big three key factors; LCP, FID and CLS.
According to Google:
Largest Contentful Paint: LCP occurring within 2.5 seconds is considered good.
First Input Delay: FID of 100 milliseconds or less is considered good.
Cumulative Layout Shift: CLS of 0.1 or less is considered good.
How To Improve Site Speed
Now that we’ve got all the important information out of the way, it’s time to jump into how to actually improve website performance.
1. Hosting
One of the first things to consider before building a website is hosting, right? Without a hosting provider, there is no website. If you’re using a popular shared web hosting provider, such as GoDaddy or Bluehost, overall performance is typically subpar.
There are four main options when it comes to hosting: shared, VPS, dedicated and serverless.
Shared Hosting – traditionally the cheapest option, as resources of the server are shared with other customers.
VPS Hosting – a virtual private server that is much faster than shared hosting, but uses multiple machines instead of one.
Dedicated Hosting – one of the most expensive options, but gives you the freedom for unlimited server configuration because it’s your machine and it’s never shared.
Serverless Hosting – becoming much more popular lately due to unmatched scalability at an extremely competitive price point.
Keep in mind that just because your site is hosted via a shared server, that doesn’t mean improving site speed is futile; it’s just not as efficient. At MK Group, we’re proud to offer our partners hosting on our own dedicated server, guaranteeing super fast load times.
2. Content Delivery Network (CDN)
CDNs optimize the delivery of static files such as CSS, images, fonts, and JavaScript to your users. Setting up a CDN is pretty simple, and much more cost-effective versus a dedicated server.
CDNs work by using geographically distributed servers. Simply put, a CDN will choose the closest server to a specific user and serve them the files from there. Without the use of a CDN, every user will get served files from your own server, which can negatively impact load times depending on how physically far the user is from said server.
3. Image Optimization
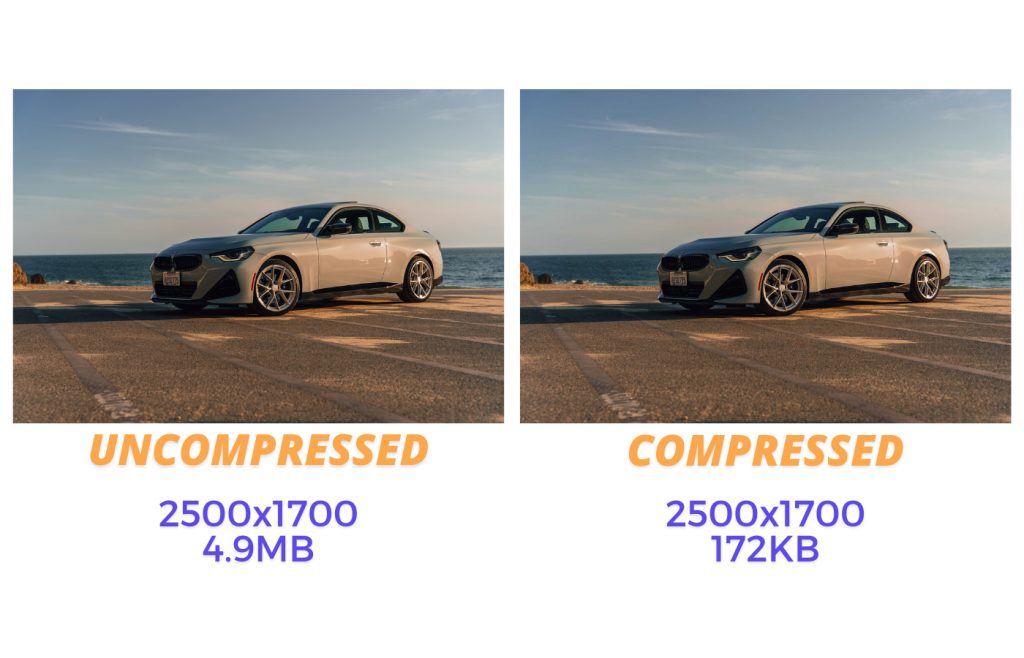
Based on our experience, improperly optimized images can heavily slow down your website. Uncompressed and high-resolution photos will eat performance. It may seem like a good idea to upload a 3 Megabyte photo in its full resolution, but trust us, it’s not.
Luckily, there’s a few options when it comes to image compression. The good news is, most of the time compressed images are lossless, meaning the difference between a full-res and a compressed photo are negligible.
The best way to compress images is to open it in Adobe Photoshop and Save for Web, shown below. If using Photoshop just isn’t possible, then using online tools such as Optimizilla and Compressor.io can work wonders. However, you’re limited to their algorithm and can’t customize the level of compression. If images are already uploaded on the site and re-optimizing is too daunting, consider using a plugin. Plugins like EWWW Image Optimizer can save a ton of time.
It’s important to utilize the correct file types. In most cases, you’ll want to use JPEG, unless the image must include a transparent background or is a simpler graphic, then opt for PNG. Additionally, you can serve images in next gen formats, like WebP. WebP images are much smaller in size compared to JPEG and PNG. This can be done manually, or with the use of a plugin.
4. Browser Caching
Browser Caching is the process of saving a version of your site in a temporary storage, a cache, that can be accessed significantly faster. The biggest advantages of caching is reduction of bandwidth consumption, faster load times, reduced latency, and reduced server workload.
The downsides however, are that there’s two versions of the site. This becomes an issue when a website heavily relies on accurate real-time data. That said, this can be controlled by forcing periodic cache purges and scheduled preloads.
If the site is on the WordPress platform, the easiest way to enable browser caching is via a plugin. Plugins like WP Super Cache, W3 Total Cache and WP-Optimize make enabling caching a breeze and offer other useful features, such as preloading.
If using a plugin isn’t a viable option, then manually setting up browser cache via the .htaccess file is the way to go.
Bonus Tip: Exclude specific URLs from caching so they’re always up-to-date, such as /sitemap_index.xml. This also applies to browser agent strings, like Googlebot, so the bots are always served updated content.
5. Preload & Prefetch
Preloading and Prefetching gives hints to the browser about which resources are needed to render the page before the browser actually needs those resources.
Preloading tells the browser to download and cache a resource as soon as possible. This means that resources will be readily available when a page is loaded.
Prefetching asks the browser to download and cache a resource in the background. This means resources will be downloaded and delivered as the browser sees fit.
Like browser caching, preloading and prefetching can be enabled via plugins or manually via the .htaccess file. Although this optimization is small, it makes a huge difference in site speed.
6. GZip Compression
GZip is a file format and software application that compresses HTTP content before being served to a client and is typically used for textual responses. When a user makes a request, the server compresses the requested resource before serving it, which leads to smaller file sizes and faster load times.
Again, GZip can be enabled via plugins or manually.
7. CSS, JavaScript & HTML Minification
It’s always a good idea to load both CSS and JS in a single request for each. This is done by minifying and combining separate JS and CSS files into single packages.
Minification is the process of optimizing the size of CSS and JavaScript files by removing or shortening symbols in the source code. Browsers have no problem reading the optimized code, and the smaller file sizes will be faster to load.
As with most of the mentioned technical changes, minification can be done either manually or with a plugin.
Bonus Tip: Loading CSS and JS asynchronously can also help load times.
8. Plugins
Plugins are a common component of most websites. They offer Quality of Life (QOL) settings that make the implementation of features and services super easy. On the flip side, having too many or ones that don’t have consistent support, can be detrimental.
Try to only use plugins that you absolutely need. If you don’t use one, delete it. Less is more. It’s also important to only use plugins that have been updated and still receive support. Plugins that are outdated and no longer supported, either by the developer or the CMS, can not only be a security risk, but slow websites down.
9. HTTP Requests & Redirects
HTTP requests are used by browsers to fetch various parts of a page, like images, stylesheets, and scripts from a server. Every request will have some overhead in establishing a connection between browser and server, especially when HTTP/1.1 is used.
Start by eliminating unnecessary requests. Find the minimum render time required for the website and only load necessary external resources. If using a CMS like WordPress, remove unwanted plugins as they often load additional files on pages.
Another way to improve site speed is to eliminate unnecessary 301 Redirects. Only use a 301 when the page being redirected is being permanently moved to another page.
10. Utilize HTTP/2
HTTP/2 is the latest version of HTTP which has been optimized to make websites load much faster. The biggest advantage over HTTP/1.1 is that HTTP/2 is able to send multiple files at the same time, over the same connection. Thus, reducing multiple requests.
Implementing HTTP/2 needs to be done server side or through a CMS, like WordPress.
Wrapping Up
Improving site speed and performance can be tricky, especially in an ever changing technology landscape. However, implementing some or all of these techniques will have a positive impact on your business if it relies on your website as a channel for reaching users.
It’s important to keep in mind that these processes do not have a clearly defined start and endpoint. Not all of our suggested changes need to be made. It’s a good idea to spend some time monitoring your current website performance in order to get an idea of where to start. Remember to benchmark the site before and after implementation and compare tests.
If you or someone you know is looking to take on a web design and development project, definitely get in touch with us and we can help set your brand or business up for success.